 Lirix Core
 install guide
From ISO to login prompt, one screen at a time.
Before you start: back up anything you need. Depending on the disk mode you pick, the installer can erase a whole disk. Check your download and the requirements first.
1. Prepare boot media
USB stick on Linux
Find your USB device first. Picking the wrong disk will wipe it. Use the whole device (like /dev/sdX), not a partition.
lsblk
sudo dd if=Lirix-Core-1.0-amd64.iso of=/dev/sdX bs=4M status=progress conv=fsync
USB stick on Windows
Use Rufus: choose the ISO, then pick Write in DD Image mode when it asks. balenaEtcher also works.
Virtual machines
- Proxmox: upload the ISO to your ISO storage and attach it as the CD-ROM. Set the CPU type to x86-64-v2-AES or host. Choose SeaBIOS or OVMF (UEFI); for OVMF, add an EFI disk. For the serial console entry, add a serial port (
qm set <vmid> -serial0 socket) and open the xterm.js console. - VirtualBox, VMware, QEMU: attach the ISO as an optical drive. BIOS and EFI both work.
2. Boot the live system
The GRUB menu, titled Lirix Core 1.0 (Codename Willy), counts down 5 seconds and then starts the first entry:
- Lirix Core 1.0 Live Desktop: the full LXQt desktop, logged in as
liveautomatically. - Install Lirix Core 1.0: boots straight into the installer on tty1. Press Alt+F2 for a normal login on another console.
- Lirix Core 1.0 Live Headless: text console only. Log in as
live. - Lirix Core 1.0 Live Headless, serial console: the same, with output and a login prompt on the first serial port (
ttyS0, 115200 baud).
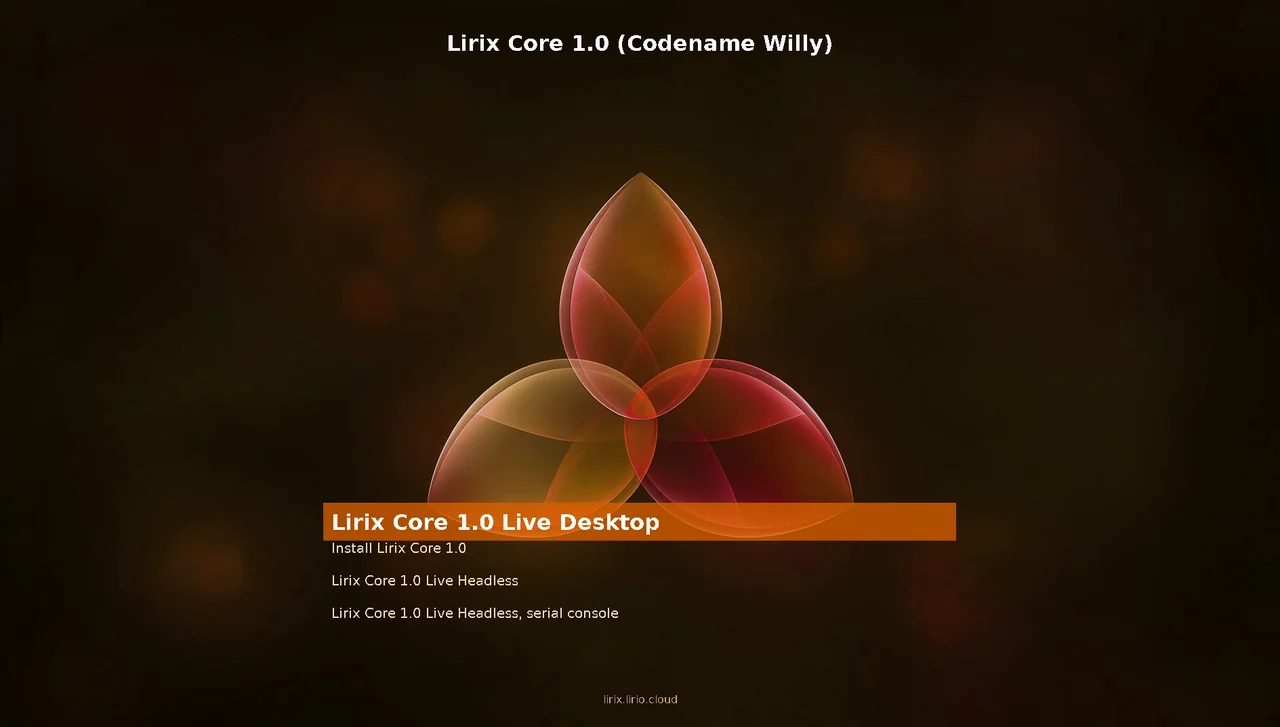
The live account is live with the password live, and it can use sudo. Root is locked. Changes live in RAM and are lost on reboot. Run ip addr to see the IP address DHCP gave you.
3. Run the installer
Choose Install Lirix Core 1.0 in GRUB, or run sudo lirix-install from a live session. Use the arrow keys, Tab and Enter. Cancel or Esc goes back one screen.
- Welcome: choose Start, or Quit (nothing has been changed).
- Edition: Desktop (LXQt with a graphical login, the default) or Headless (text console only, for servers).
- Keyboard: pick from a short list or Other for the full list. It applies right away.
- Language: a UTF-8 locale.
- Time zone and Clock: choose region and city. Keep the hardware clock on UTC unless you dual boot with Windows.
- Disk: pick the disk, then a mode:
- entire: erases everything and creates a GPT table with a 1 MiB BIOS boot partition, a 512 MiB EFI partition and an ext4 root.
- manual: opens cfdisk, then you choose the
/partition (formatted ext4) and the EFI partition. An existing FAT EFI partition is reused without formatting. - free: keeps other systems. Needs a GPT disk with at least 8 GiB of free space in one piece.
- Network: choose the card, then Automatic (DHCP) or Static IP address.
- Hostname: default
lirix-core. - Username and Password: your everyday account, for example
alex. It joins thewheelgroup for sudo; root stays locked. - Summary: everything you chose and exactly what will happen to the disk. Nothing is written until you choose Install.
- Progress and Finished: remove the ISO or USB stick, then choose Reboot or Power off.
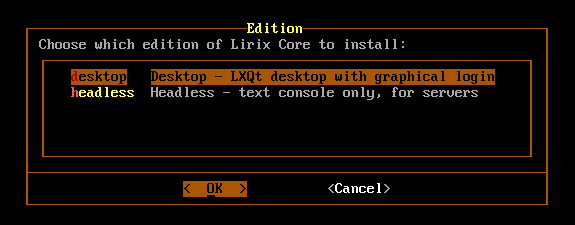
If something fails, the installer shows the error and the last log lines. The full log is /tmp/lirix-install.log on the live system.
The installer installs GRUB for both BIOS and UEFI (UEFI uses the fallback path EFI/BOOT/BOOTX64.EFI, so no NVRAM entries are needed), writes /etc/fstab with UUIDs, and sets Desktop to runlevel 5 with SDDM or Headless to runlevel 3.
4. First boot
Desktop edition
GRUB offers Lirix Core 1.0 (quiet boot to the desktop), Lirix Core 1.0, verbose (all kernel messages) and Lirix Core 1.0, console only (text login). The Lirix Core login screen shows a 12-hour clock. Sign in and keep LXQt Desktop as the session.
Headless edition
GRUB has a single Lirix Core 1.0 entry, and boot stops at a text login:
Lirix Core 1.0 (Codename Willy) lirix-core tty1
lirix-core login:
Both editions
Use sudo for admin tasks. sudo whoami prints root.
5. Using the Desktop edition
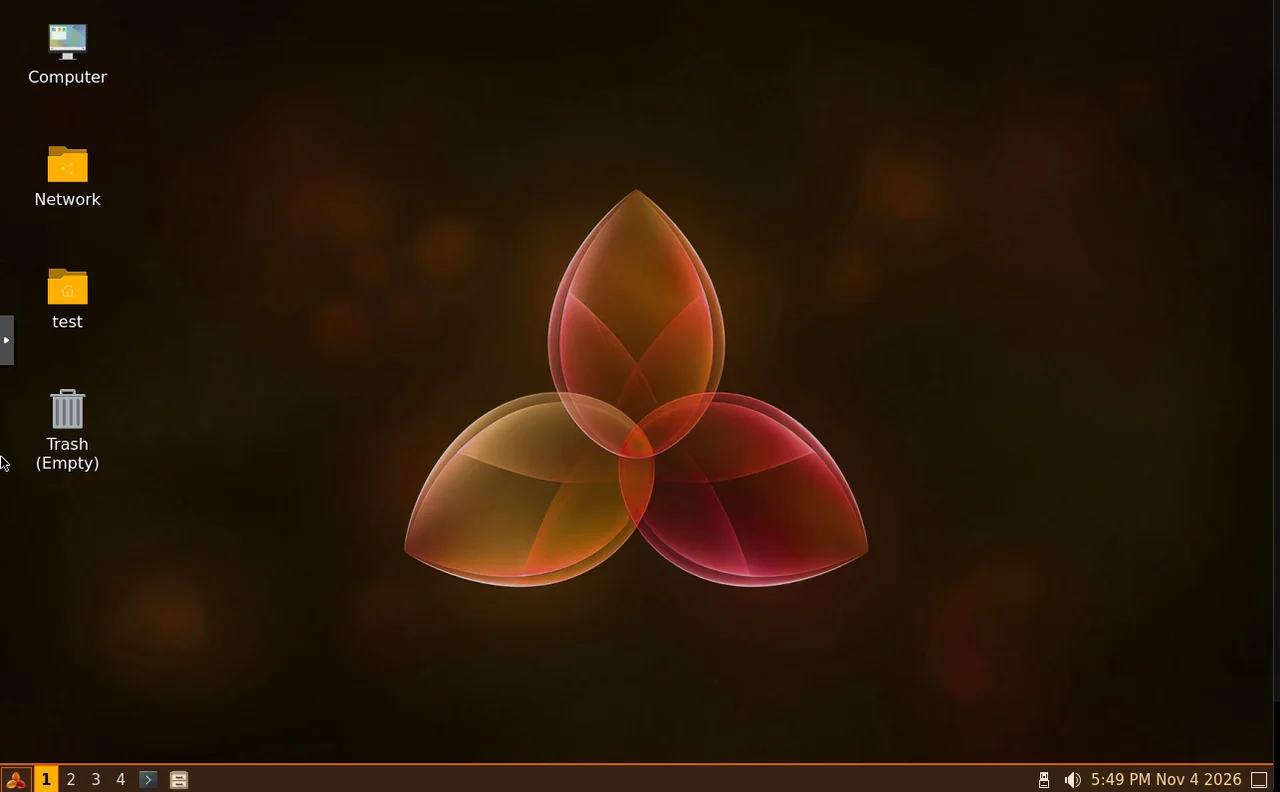
- Desktop icons: Computer, your home folder, Network and Trash.
- Panel: the three-petal start button opens the menu, then four virtual desktops and quick-launch buttons for Terminal and Files. Volume, clock and show-desktop sit on the right.
- Terminal: QTerminal with the amber
user@host:~$prompt. - Files: PCManFM-Qt. Type an address like
sftp://user@host/to browse an SFTP server. - Look and feel: a copper panel with amber highlights and black text. Change it under Preferences → LXQt Settings.
Switching editions after install
Desktop to headless:
sudo sed -i 's/^id:5:initdefault:/id:3:initdefault:/' /etc/inittab
sudo reboot
Headless to desktop:
sudo sed -i 's/^id:3:initdefault:/id:5:initdefault:/' /etc/inittab
sudo reboot
6. Post-install tips
Static IP
Edit the file the installer wrote for your card (find it with ls /etc/sysconfig/ifconfig.*):
ONBOOT=yes
IFACE=eth0
SERVICE=ipv4-static
IP=192.168.1.50
GATEWAY=192.168.1.1
PREFIX=24
BROADCAST=192.168.1.255
Set DNS in /etc/resolv.conf, then run sudo /etc/rc.d/init.d/network restart.
Hostname
echo "newname" | sudo tee /etc/hostname
sudo nano /etc/hosts
sudo reboot
Another user
sudo useradd -m -G wheel,audio,video,input newuser
sudo passwd newuser
7. Troubleshooting
- A UEFI VM boots to PXE or the firmware menu (Proxmox OVMF)
In Options → Boot Order, make sure the disk is listed, its Enabled box is checked, and it's above the network device.
INIT: Id "S0" respawning too fastHarmless: there's no serial port. Add one to the VM, or comment out the
S0line in/etc/inittab.- I want to see boot messages
Pick the verbose GRUB entry. For every boot, set
LOGLEVEL=7in/etc/sysconfig/rc.siteand removequiet loglevel=3from/boot/grub/grub.cfg.- Black screen after login
Press Ctrl+Alt+F2, log in, and check
~/.local/share/xorg/Xorg.0.logor/var/log/Xorg.0.log. Make sure the session is LXQt Desktop and the VM has a display device.Illegal instructionerrorsThe CPU type is too old (for example Proxmox
kvm64). Usex86-64-v2-AESorhost.- fastfetch colors look wrong
The plain console only has 16 colors. Over SSH in a modern terminal the logo shows in proper amber.
8. Known limitations
- The installer log in
/tmpis lost on reboot; copy it first if you need it. - Secure Boot is not supported.
- Desktop: no automatic mounting of USB drives (no udisks2), no Samba or Avahi, and no SPICE clipboard yet.
- x86-64 only.
Questions or bug reports: lirix@lirio.cloud